 Home
HomeInstallation
This document will walk you through the installation process of CFDEM®coupling. First Aspherix® needs to be installed using its installer. OpenFOAM® and CFDEM®coupling are then installed. Finally, basic test cases are run to verify the successful installation.
As prerequisites OpenFOAM-10 and cmake >= 3.10 need to be installed. On Ubuntu 18.04+ cmake is installed during the OpenFOAM® installation with an appropriate version.
Install Aspherix®
Before installing CFDEM®coupling, it is necessary that Aspherix® is properly
installed on your system, see Installation & License Management.
The default installation location of Aspherix® on your system is $HOME/DCS-Computing.
You can test your Aspherix® installation by typing aspherix in your console.
If successful, this command should create the output
Aspherix (Version ...) Checkout of asx_solver OK.
Compile from sources
Setup the environment
We start by getting the software, organizing file structure and setting up the environment.
As a prerequisite for the OpenFOAM® installation you need to download and install additional software packages (see the OpenFOAM webpage for more details). On Ubuntu 22.04 and newer execute the following command in a terminal:
sudo apt-get install build-essential cmake git ca-certificates flex libfl-dev bison \
zlib1g-dev libboost-system-dev libboost-thread-dev libopenmpi-dev openmpi-bin gnuplot \
libreadline-dev libncurses-dev libxt-dev
Retrieve the source code. The following commands will create the required folders in an
OpenFOAMdirectory in yourHOMEfolder and download the desired version:cd $HOME mkdir OpenFOAM cd OpenFOAM git clone https://github.com/OpenFOAM/OpenFOAM-10.git git clone https://github.com/OpenFOAM/ThirdParty-10.git cd OpenFOAM-10 git checkout 362b7b6bb8eb5c4ac92e12856b3455cdacc1166a cd ../ThirdParty-10 git checkout ae545a01baf66780285a2015da8a23c0a2dda5de
Unzip the CFDEMcoupling archive you received into the folder
$HOME/DCS-Computing.Source the bashrc file for CFDEMcoupling. It takes care of setting up the environment variables for OpenFOAM and CFDEMcoupling:
source $HOME/DCS-Computing/CFDEMcoupling-|package|-|version|/etc/bashrc
Note
If you are running on a
zsh, sourcezshrcfrom the same location.Note
If you have not copied files to the default locations, you may need to set the
CFDEM_OF_DIRorCFDEM_ASX_INSTALL_DIRenvironment variables to set the OpenFOAM and / or Aspherix install directories.Test your setup using the system test command:
cfdemSysTestNote
Please note the output of the number of threads per core and the recommendation for the CFD-DEM hyperthreading setting.
Compile OpenFOAM
In the same terminal as you used to set the environment, compile OpenFOAM by executing the following steps:
cd $WM_PROJECT_DIR
./Allwmake
If you opened a new terminal, you first need to source the
bashrcagain.. Depending on your hardware and the amount of cores used, compilation of OpenFOAM can take an hour or more.Note
By default the compilation will use all cores available on your machine. You can set the number of cores used by setting the variable
WM_NCOMPPROCS.To test your installation, check that the
simpleFoamapplication is found:simpleFoam -helpThis command should print a “Usage” message to screen.
Compile CFDEMcoupling
Still in the same terminal, compile CFDEMcoupling by executing
cfdemCompCFDEM
from any location. This command automatically compiles all the CFDEM®coupling libraries, CFDEM®coupling solvers and CFDEM®coupling utilities. The compilation will stop, if build errors occur.
The compilation is automatically logged and the logs can be found in:
$CFDEM_ETC_DIR/log
Note
If compiling on a different Linux distribution than Ubuntu, further settings may be required.
In case questions concerning the installation arise, please feel free to contact DCS Computing.
Install from binary packages
Setup the environment
Unpack the OpenFOAM® binary package to a suitable location, e.g.
$HOME/OpenFOAM/OpenFOAM-10Note
Depending on your specific Linux version, the binary package provided by the system or some external source may not provide a suitable OpenFOAM version. If you want to install a binary package, please use the package provided by DCS Computing.
Unpack the provided binary
.tar.gzpackage to a suitable location. Alternatively, if you install from the.debpackage, the default install location is/opt/CFDEM/CFDEMcoupling-|package|-|version|.sh.Source the bashrc to load the environment, e.g.:
source $HOME/CFDEM/CFDEMcoupling-|package|-|version|/etc/bashrc
If you unpacked to a different location, adjust the command accordingly. Preferably, add this command to your
.bashrc.
Compile from sources for GPU
Setup the environment
Note
The current version of CFDEM®coupling for the GPU only compiles with the SPUMA derivation of OpenFOAM®-v2412. Moreover, CFDEM®coupling has only been tested with the NVIDIA backend.
Warning
These instructions assume that there is no OpenFOAM environment loaded when you begin. If you have already installed the CPU-version of CFDEMcoupling and automatically load the corresponding environment, please remove the automatic environment loading before you start installing the GPU-version. You can re-enable the automatic environment loading after you have finished this installation process.
SPUMA (Simulation Processing in Unified Memory Accelerators) is a CFD software released by Cineca based on OpenFOAM®. It implements a full GPU porting of OpenFOAM targeting NVIDIA and AMD GPUs. [Publication]
Prebuilt binaries are unfortunately not available so you will need to download and build, both, SPUMA and OpenFOAM yourself.
In addition to the packages required by OpenFOAM, you will need to download the Nvidia HPC SDK. This package provides the necessary CUDA compilers and libraries to compile SPUMA with the the Nvidia backend. Download and install Nvidia SDK according to instructions
Make sure that the Nvidia SDK is in your system
PATH:export PATH="/opt/nvidia/hpc_sdk/Linux_x86_64/<sdk_version>/compilers/bin:$PATH"
If you installed the HPC SDK to a different location, update above command accordingly.
Check if the correct Nvidia
nvc++compiler is functional by running:which nvc++ # full path to the compiler -- should match what you exported nvc++ --version # the version number -- indicates if the compiler actually runs
Note
SPUMA requires the Nvidia HPC SDK – A normal CUDA installation is not sufficient!
Instead of native OpenFOAM, download and compile SPUMA. The following steps create the required folder structure and clone the repositories to the correct locations:
cd $HOME
mkdir OpenFOAM
cd OpenFOAM
git clone https://gitlab-hpc.cineca.it/exafoam/spuma --branch develop
cd spuma
git checkout 9c06274b1cc8cc758656b5c55b31a5c6bee33421
git clone https://develop.openfoam.com/Development/ThirdParty-common.git --branch v2412 ThirdParty
Note
SPUMA expects the
ThirdPartyfolder inside its root directory. This structure differs from conventional OpenFOAM which expects it one directory up.Refer to the complete set of instructions for compiling SPUMA in case you have specific needs or problems.
Unzip the CFDEMcoupling archive you received into the folder
$HOME/DCS-Computing.Source the bashrc file for CFDEMcoupling. It takes care of setting up the environment variables for SPUMA and CFDEMcoupling:
export CFDEM_OF_DIR="$HOME/OpenFOAM/spuma"
export NVARCH=70
source $HOME/DCS-Computing/CFDEMcoupling-|package|-|version|/etc/bashrc
In addition to the default setup for CPU, you need to add settings to account for the SPUMA path and set the architecture of your GPU by setting the
CFDEM_OF_DIRvariable. SPUMA will set the default compiler to the Nvidia compiler, i.e.export WM_COMPILER=Nvidia.Note
If you are running on a
zsh, sourcezshrcfrom the same location.Note
The Nvidia HPC SDK must be on your
PATHto compile SPUMA and CFDEMcoupling with GPU support. If you are on a new terminal, you need to add the SDK to yourPATHvariable as discussed above.Warning
Setting
NVARCHincorrectly will not cause any compilation errors, but you will have a runtime crash as the necessary GPU kernels have not been compiled.
Compile SPUMA (OpenFOAM® on GPU)
In the same terminal as you used to set the environment, compile OpenFOAM by executing the following steps:
cd $WM_PROJECT_DIR
./Allwmake
Depending on your hardware and the amount of cores used, compilation of SPUMA can take an hour or more.
To test your installation, check that the
simpleFoamapplication is found:simpleFoam -helpThis command should print a “Usage” message to screen.
Note
Due to how the SPUMA build process for the GPU works, a failed or incorrectly configured compilation run may leave artifacts that prevent a proper re-compilation of the source code. If this issue occurs you may need to delete the
buildandplatformsdirectories in the SPUMA root directory.
Compile CFDEMcoupling
Still in the same terminal, compile CFDEMcoupling by executing
cfdemCompCFDEM
from any location. This step behaves in the same manner as for the CPU compilation.
Note
Since compiling with SPUMA uses a different compiler toolchain than a normal OpenFOAM/CFDEM®coupling build it is possible to have both versions compiled and installed on your system. It is however not possible to have both versions loaded at the same time and you must make sure that you are not mixing the CPU and GPU environments. Have a look at the next section on approaches to persistently or conditionally set your environment.
In case questions concerning the installation arise, please feel free to contact DCS Computing.
Make your environment persistent
In the current setup, you have to load the environment in every new terminal that you open. There are several options to simplify loading the environment or making your environment persistent:
Add the line
source $HOME/DCS-Computing/CFDEMcoupling-|package|-|version|/etc/bashrc
to your
.bashrc(or equivalent) file.Setup a load script that you can source on demand. This approach is especially useful if you want to use several versions in parallel and switch between them. You can source a default file in your
.bashrcto always source a default environment.Add a function to your
.bashrcto load an environment on demand:loadCfdem_|version|() { # do extra environment settings like OF or Aspherix dir before sourcing the bashrc source $HOME/DCS-Computing/CFDEMcoupling-|package|-|version|/etc/bashrc }
To call this function, just type
loadCfdem_|version|into your terminal.You can define several of these functions (with different names) and, as with the default load script, you can call one of those functions in your
.bashrcto always source a default environment.Default function / settings to load a GPU environment
loadCfdemGPU_|version|()
{
    export PATH="/opt/nvidia/hpc_sdk/Linux_x86_64/<sdk_version>/compilers/bin:$PATH"
    export CFDEM_OF_DIR="$HOME/OpenFOAM/spuma"
    export NVARCH=70
    source $HOME/DCS-Computing/CFDEMcoupling-|package|-|version|/etc/bashrc
}
Test the installation
A simple way to test your installation is by running a tutorial case. In order to
run a single tutorial it is recommended to use the Autorun.sh scripts in the
tutorial directories (or their older counterparts Allrun.sh). They execute the
simulation and provide some basic output (e.g., comparison of simulation output with
an analytic solution).
Note
If you want to test the GPU version, please use Fluidized Bed (GPU). Or consider using Settling of a single particle vs. analytic solution or Ergun test if you are looking for a smaller case setup.
Now, we describe briefly how to run a simple test case – cfdemSolverPiso/settlingTest
– which models the settling of a single sphere using cfdemSolverPiso and
plots its velocity.
Open a terminal and navigate to the tutorial folder:
cfdemTut
cd cfdemSolverPiso/settlingTest
Note
If you do not load the environment in your .bashrc, you need to load it before
the cfdem commands are available.
Use, for instance, the script load_CFDEMcoupling-|package|-|version|.sh located
at the root of your CFDEMcoupling installation.
Run the simulation by executing the Autorun.sh script in the terminal:
./Autorun.sh
The executed script will prompt to select a variant for the test cases to run:
Available case variants (base variant is usually 'cfdemrun'):
-------------------------------------------------------------
1.) cfdemrun
2.) cfdemrun-serial
3.) cfdemrun-DEMbasedDrag

Which do you want to run? (Enter index):
Enter 1 to select the base variant cfdemrun. The other variants will change
the case to use serial execution (2) or use a different drag law (for 3 the
DEMbasedDrag).
This will trigger Aspherix® to start the DEM simulation and CFDEM®coupling to
start a coupled CFD-DEM simulation. Both simulations will communicate via socket
and exchange the necessary data, e.g. particle position and velocity is communicated
from DEM to CFD and the drag force is communicated from DEM to CFD. When the simulation
is finished, a plot of the particle settling velocity pops up. The simulation result
is compared to the analytical solution. You can visualize the simulation data using,
e.g. Paraview.
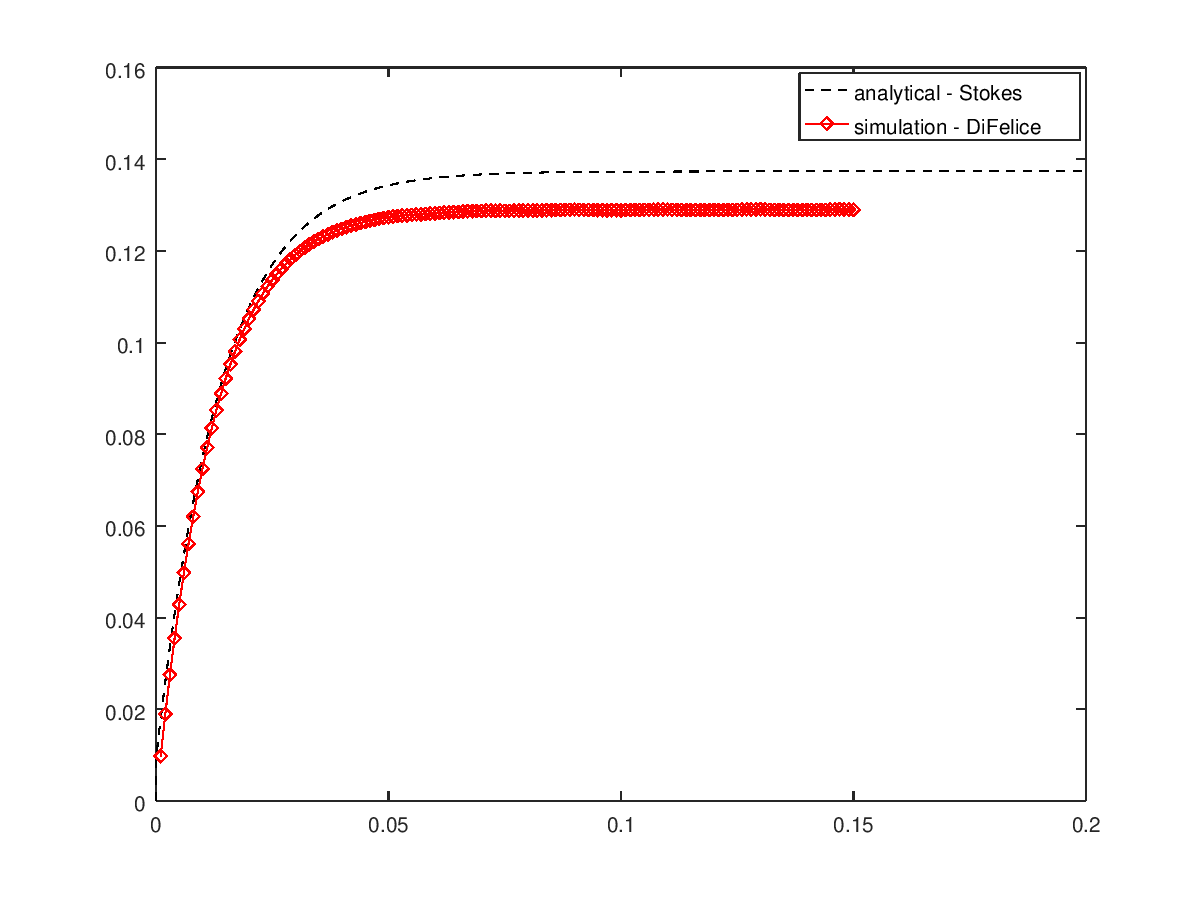
In above plot the particle velocity (settling velocity) is plotted over time in red. The black line gives the analytical solution for the settling velocity using the Stokes drag law. Therefore, a slight offset between red and black line is to be expected.
You can run all the tutorial cases sequentially by executing the alias cfdemTestTUT. For running pure Aspherix® cases, you can use the aliases
cfdemAspherix inputScriptName
cfdemAspherixPar inputScriptName nOfProcs
In the tutorials section you find more details on setting up and running a tutorials.
Note
If you want to run your own cases, it is recommended to first copy the tutorial
case to $CFDEM_PROJECT_USER_DIR/run which is automatically being generated when
you use the cfdemRun alias to go there for the first time.
E.g., copy one of the tutorial cases there, and adapt it to your needs before
running. This helps you keeping the tutorial in its original clean and working state.
Visualization using Paraview and Macro
To facilitate data loading a paraview macro is available to split loaded OpenFOAM / CFDEMcoupling data into separate blocks for internal field, patches, and –if present – particles.
Note
The macro is automatically installed during compilation. This means that you need to perform the steps described below only if you want to use the Macro on a system (or for a user) where no CFDEMcoupling is compiled.
Installation
To use this macro copy it from its location to the Paraview Macro folder:
cp -r $CFDEM_ETC_DIR/paraview/CFDEMcoupling* <pv_macro_dir>/
where the pv_macro_dir is:
- on Linux:
  $HOME/.config/ParaView/Macros'
- on Windows
  %userprofile%\AppData\Roaming\ParaView\Macros
On Linux (assuming the above location of the Paraview config folder) you can also use:
cfdemInstallParaviewMacro
Usage
Load the CFD results by opening any *.foam file in the CFD or CFD/system
directories. After loading CFDEMcoupling simulation results you can run the
CFDEMcoupling macro to split up the multiblock data, see Figure 2.
Select all blocks when loading the data, i.e. also the boundaries and particles
(if present), see Figure 1.
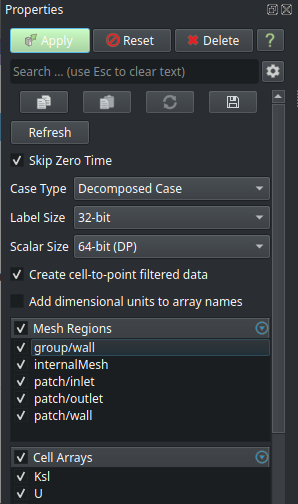
Figure 1: Block selection.
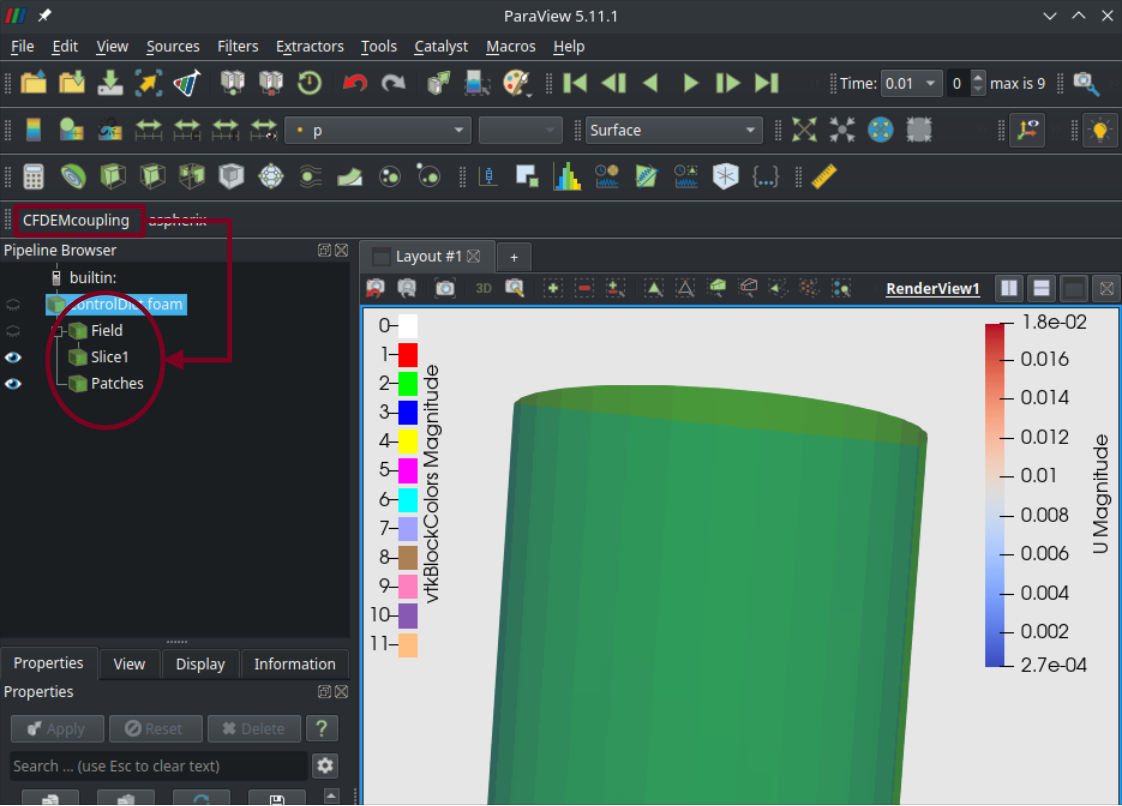
Figure 2: CFDEMcoupling results split using the paraview macro.
Particle data
By default, particle data is written by Aspherix and stored in the DEM/post
folder. To load all particle data, simply load the file aspherix_simulation.pvd
found in that directory.
To output particle data also on the CFD side, use an additional IOModel, e.g. basicIO.
CFDEM Paraview reader
In addition to the macro, a reader for coupled simulation results is installed automatically and should be available by default. If you install the macro manually as described above, the reader should also become available.
The CFDEMcoupling reader reads *.cfdem files and exposes a node for, each, the CFD
and the DEM results to which the corresponding macros may then attach. However,
you still need to run the macros manually.
The .cfdem file should be located in the root of the case directory.
Note
The reader is still at an early stage of development. If you encounter issues, please contact us.
Note
The usage of this reader is optional. You can always load the CFD and DEM results separately using the OpenFOAM and VTK-PVD readers.
Advanced installation information (optional)
In case the above instructions do not suit your needs, you can find advanced installation instructions in the following page:
- Download OpenFOAM® zip archives
- Install OpenFOAM® from package
- OpenFOAM® and MPI
- Compiling CFDEM®coupling on different linux distributions
- Compiling OpenFOAM® and CFDEM®coupling in debug mode
- Install swak4FOAM (optional)
- Backward Compatibility
- Install git
- Install Helyx®OS (optional)
- Install OpenFOAM on Windows
In case futher questions concerning the installation arise, please feel free to contact DCS Computing.
Footnotes:
OPENFOAM® is a registered trade mark of OpenCFD Ltd, producer and distributor of the OpenFOAM software via https://www.openfoam.com.
HELYX® is a registered trade mark of Engys Limited, producer and distributor of the Helyx software via https://engys.com.